Ever since the rise of Lomography (lomo for short) and Instagram, the people's love for photography has gone through the roof. Back then, people are strapped with toy cameras clicking happily while finishing a roll of expired film. Images produced by these nifty toy cameras loaded with expired film are often over exposed, vivid, lo-fi and dreamy which made the photo more interesting.
 |
| A sample of a photograph a lomo camera produces. |
Fast forward to 2010 the phenomenal app Instagram was launched. People got hooked with it, because not only you are able to share images in the internet with your iPhone (recently available for Android) and gain followers you are also able to customize your photograph through the use of filters. The effect is somewhat similar to a Polaroid and Kodak's Instamatic. This makes your ordinary vignettes of mundane objects look cool and interesting.
 |
| A Instagram image |
Photographers too has adopted the use of creative filters to give their photographs more oomph. They do this in Adobe Photoshop. While there are heaps of plugins and actions that will instantly give your photograph that lo-fi look, the problem is the limited pool of choices you can make and more often than not the look that you desire is not in there.
If you are already familiar with cross-processing then this is piece of cake for you. Now for those of you who are new or just have heard the term cross-processing for the first time then you better check this out. Our primary tool in this tutorial is the Adjustment layers which is available in CS3 to CS6 so no matter what version you are using you'll be able to follow the steps that I'm going to share to you.
Here's the before and after of the image. Alright let's do this!
1. Let's start off with a unprocessed jpeg photo in RGB format.
2. Next we duplicate the layers, CTRL+J for Windows and Command+J for Mac. This is just to make sure that we will not make any changes to the original layer despite using adjustment layers.
3. Now the magic begins. Go to adjustment layers, If you don't see it just go to Windows > Adjustments. Good? Alright, now click Exposure (encircled in red)
3.1. Now we are going tweak the Exposure layer. Since most lo-fi effects have a bit of that washed up look we'll tweak the Offset just a little bit. This will give the photo a slightly washed up look.
4. Next, click Curves in the adjustment layer.
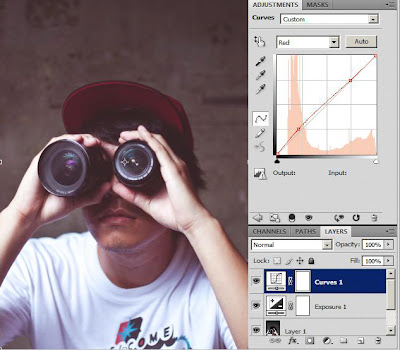
4.1. While in Curves we have to select the individual color channels and tweak it there. For now we will not dabble with formulas in adjusting the curves. This is purely up to you on how you want your final image to be.
4.2. Now go to the red channel. Just to be safe what you can do first is make a bit of an "S" curve either a inverted "S" or a regular "S" it is up to you so experiment. In my case I want the reds in the image to be a bit reddish and leaning a bit towards purple. So this is what I did:
 |
| Not much of an S shape eh :) |
4.3. Next up is the green channel. Same thing but instead of doing an S shape I did more of a lump. Now you'll notice that after you tweak the curves in the green channel the color of the whole image change from purple-ish to a dull greenish tint.
This is because all the information in color channels are stacked together I'll explain further next time since this topic requires more research.
4.4. Lastly we'll go for the blue channel same principle just tweak the curves till you get what you wanted. Here's mine:
I did a inverted S for this one to bring back some of the purple tint and lessen the yellow a bit.
5. Before we finish this tutorial I wanted to bring back some of the lost contrast so I've decided to use levels you can do this either pressing CTRL+L (Windows)/Command+L (Mac) or just use the levels in Adjustment layers which I prefer since you can go back to levels again and again without ruining the image.
Save to jpeg and you are done!
So there you go! With the help of adjustment layers you can turn any ordinary looking photographs to cool lo-fi photos.
Cheers!


